
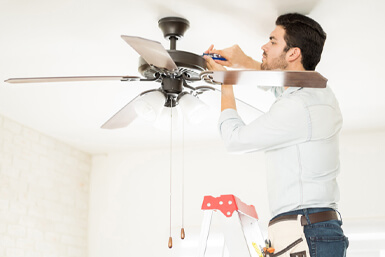
To hook up ceiling fan wires, follow the manufacturer’s instructions and connect the corresponding wires using wire connectors. A ceiling fan is an essential addition to any household, especially during the summer months.
However, installing one can seem like a daunting task for many individuals. One of the crucial steps in the installation process is hooking up the ceiling fan wires. Getting this process right is critical to ensure the fan functions properly and safely.
The first step is to gather all the necessary tools, including wire strippers, pliers, and wire connectors. It is also important to follow the manufacturer’s instructions carefully before starting the installation process. In this article, we’ll walk you through the steps on how to hook up ceiling fan wires professionally.
Credit: www.directenergy.com
Contents
Understanding The Basics Of Ceiling Fan Wiring
Welcome to our guide on how to wire a ceiling fan! Before we delve into the actual process, it’s essential to understand the basics of ceiling fan wiring.
Fan Motor
The fan motor is the heart of the ceiling fan. It’s responsible for powering the fan blades to move the air and produce a refreshing breeze. Here are some key points to consider when it comes to the fan motor wiring:
- The fan motor has two wires – the neutral wire and the hot wire.
- The neutral wire is usually white or gray and connects to the fan’s neutral wire.
- The hot wire is usually black or red and connects to the fan’s hot wire.
- The ground wire is usually green or copper and connects to the fan’s ground wire.
Blades
Ceiling fans come with different numbers of blades – usually three to five – and in different sizes. When replacing or installing ceiling fan blades, you must ensure that the blades are compatible with the fan and that they are properly aligned.
Here are some key points to consider when it comes to ceiling fan blade wiring:
- Always ensure that the power is switched off before working on the ceiling fan blades.
- The blades should be connected to the blade irons, which are then attached to the fan motor.
- The blade irons have screws that secure the blades to them.
- Ensure that the blades are properly aligned by using a balancing kit.
Housing
The housing is the part of the ceiling fan that connects the fan motor to the ceiling. It houses the wires that supply power to the fan and usually has a cover to conceal the wires. Here are some key points to consider when it comes to ceiling fan housing wiring:
- The housing should be securely attached to the ceiling joist or electrical box.
- The wires feeding into the housing should be connected to the wires supplying power to the ceiling fan.
- The housing cover should be properly installed to conceal the wires and screws holding the housing to the ceiling.
There you have it – the basics of ceiling fan wiring. With this knowledge, you’ll be able to successfully wire your ceiling fan and enjoy the cool breeze it produces. Remember to always consult the manufacturer’s instructions and turn off the power supply before carrying out any wiring work.
Tools And Materials Needed For Wiring A Ceiling Fan
Wiring a ceiling fan can be a great way to keep your home comfortable during those hot and humid days. It is also a task that requires specific tools and materials. Here are some of the items that you will need to get the job done:
Wire Strippers
Wire strippers are handy tools that are essential for wiring a ceiling fan. They are used to remove the insulation from the wires that connect the fan to the electrical system. Here are some key points to remember when working with wire strippers:
- Make sure that you choose the right size of wire strippers for your job.
- Be careful not to damage the wires while stripping them.
- Follow the manufacturer’s instructions when using wire strippers.
Screwdrivers
Screwdrivers are another essential tool for wiring a ceiling fan. They are used to secure the fan to the ceiling and to connect the wires to the electrical system. Here are some key points to remember when working with screwdrivers:
- Make sure that you choose the right type of screwdrivers for your job.
- Be careful not to strip the screws while working with them.
- Follow the manufacturer’s instructions when using screwdrivers.
Electrical Tape
Electrical tape is a type of adhesive tape that is used to insulate electrical wires and connections. It is an essential tool for wiring a ceiling fan. Here are some key points to remember when working with electrical tape:
- Make sure that you choose the right type of electrical tape for your job.
- Use electrical tape to insulate wire connections and to cover exposed wires.
- Follow the manufacturer’s instructions when using electrical tape.
Wire Nuts
Wire nuts are small plastic caps that are used to connect and insulate electrical wires. They are essential for wiring a ceiling fan. Here are some key points to remember when working with wire nuts:
- Make sure that you choose the right size of wire nuts for your job.
- Use wire nuts to connect and insulate wires, following the manufacturer’s instructions.
- Make sure that the wire nuts are secure and properly covering the wires.
Voltage Tester
A voltage tester is an electronic tool that is used to test the presence of electrical current in wires or devices. It is an essential tool for wiring a ceiling fan. Here are some key points to remember when working with a voltage tester:
- Make sure that you choose the right type of voltage tester for your job.
- Follow the manufacturer’s instructions when using the voltage tester.
- Use the voltage tester to ensure that there is no power in the circuit before starting any work.
By using these tools and materials, you can safely and effectively wire a ceiling fan in your home. Remember to always follow the manufacturer’s instructions and to take all necessary safety precautions.
Step-By-Step Guide To Wiring A Ceiling Fan
Ceiling fans are an excellent way to keep your home cool and comfortable during summer months. Not only do ceiling fans add a decorative touch to any room, but they also help lower energy consumption and costs. Learning how to wire a ceiling fan is a simple diy project that you can easily accomplish with a few basic tools and instructions.
Turn Off The Power
Before you embark on wiring your ceiling fan, it’s essential to turn off the power. Ensure that you locate the circuit breaker that governs the area where you’re working. Flip the switch to turn off the power supply for that area.
Install The Mounting Bracket
Once you have switched off the power, you can begin installing the mounting bracket on your fan’s electrical box. First, thread the wires of the electrical box through the center hole in the mounting bracket. Afterward, fix the bracket tightly to the electrical box using screws.
Connect The Wiring
The next step is to connect the wiring of the ceiling fan to the electrical box. To do this, you need to match the wires correctly. The wires of the electrical box should be color-coded with black and white, while those of the ceiling fan should be differently colored.
Therefore, connect the black wire of the ceiling fan to the black wire of the electrical box and repeat the same for the white wire.
Install The Fan Blades
Next, attach the fan blades to the ceiling fan by positioning them with the help of blade brackets. Ensure that each blade is tightened to the bracket using screws. Make sure that the blades are well-balanced to prevent unnecessary wobbling or vibrations.
Attach The Light Kit (If Applicable)
In case your ceiling fan comes with a light kit, you can install it after mounting the fan blades. The light kit should come with set-up instructions. After reading and understanding them, attach the light kit to the fan with the screws provided.
You now know how to wire a ceiling fan. Take your time and follow these instructions to ensure that you properly install your fan, bringing more comfort to your home. Remember, if you experience any difficulties, do not hesitate to seek assistance from a qualified electrician.
Testing Your Ceiling Fan Wiring
Now that you have successfully wired your ceiling fan, it is time to test it. Here is a step-by-step guide on how to test your ceiling fan wiring.
Turn On The Power:
- First, ensure that all the switches that control the power supply to the ceiling fan are in the off position.
- After that, go to the main electrical panel and turn on the power supply for the ceiling fan.
- Now, go back to the switch panel and turn on the switches for the ceiling fan.
- You should hear a humming sound indicating that the ceiling fan is working.
Test The Fan Motor And Blades:
- The next step is to test the fan motor and blades.
- Set the ceiling fan to the highest speed setting and check if the blades are moving correctly.
- Ensure that the blades are not wobbling and that they are spinning in the right direction (counterclockwise during the summer and clockwise during the winter).
- If the blades are wobbling, tighten the mounting screws.
Test The Fan Light (If Applicable):
- If your ceiling fan has a built-in light, then you need to test it.
- Turn on the light switch and make sure that the light is working correctly.
- Check if the light is emitting enough light, and if it is not, then consider changing the light bulb.
- Also, check if the fan motor and light switch are working together as intended.
Congratulations, you have successfully wired your ceiling fan and tested it! Always ensure safety precautions when dealing with electrical wiring and refer to the manufacturer’s instructions for further guidance.
Frequently Asked Questions Of How To Hook Up Ceiling Fan Wires?
What Are The Necessary Tools To Hook Up Ceiling Fan Wires?
A pair of wire strippers, a voltage tester, a screwdriver, and wire nuts are essential tools required to hook up ceiling fan wires.
How Do I Identify Wires On My Ceiling Fan?
Identify the wires by their color coding. The black wire is for the fan, the white wire is for the neutral, the green or bare wire is for the ground, and the blue or red wire is for the light kit.
How Should I Prepare Before Wiring My Ceiling Fan?
Disconnect the power supply, read the manual, gather the tools, remove the old fan if any, and identify the wires before wiring your ceiling fan.
How Do I Connect My Ceiling Fan To My Electrical Box?
After identifying the wires on the fan and electrical box, match the colors, twist the wires together, and secure with wire nuts. Affix the canopy and install the fan blades.
What Is The Importance Of A Fan-Rated Junction Box?
A fan-rated junction box is important to safely hold the weight and motion of a ceiling fan and reduce the risk of accidents or injuries. Ensure that the junction box has the appropriate weight rating for the fan.
Conclusion
Now that you have learned how to hook up ceiling fan wires, you can easily install a ceiling fan in your home. Remember to follow safety precautions and turn off the power before beginning the installation process. Start by assembling the fan parts and identifying the wires, then connect the wires using wire nuts and secure them with electrical tape.
Finally, attach the fan blades and turn on the power to test your installation. With these simple steps, you can enjoy the comfort of a ceiling fan in any room of your home. Don’t forget to refer back to this guide or seek professional assistance if you encounter any difficulties during the installation process.
Happy diy-ing!